

Today we will diversify your animal amigurumi collection with a little bunny amigurumi crochet pattern. Distinguishing from other bunny, this little one looks proper with a tie bow. Have a success of your new amigurumi!
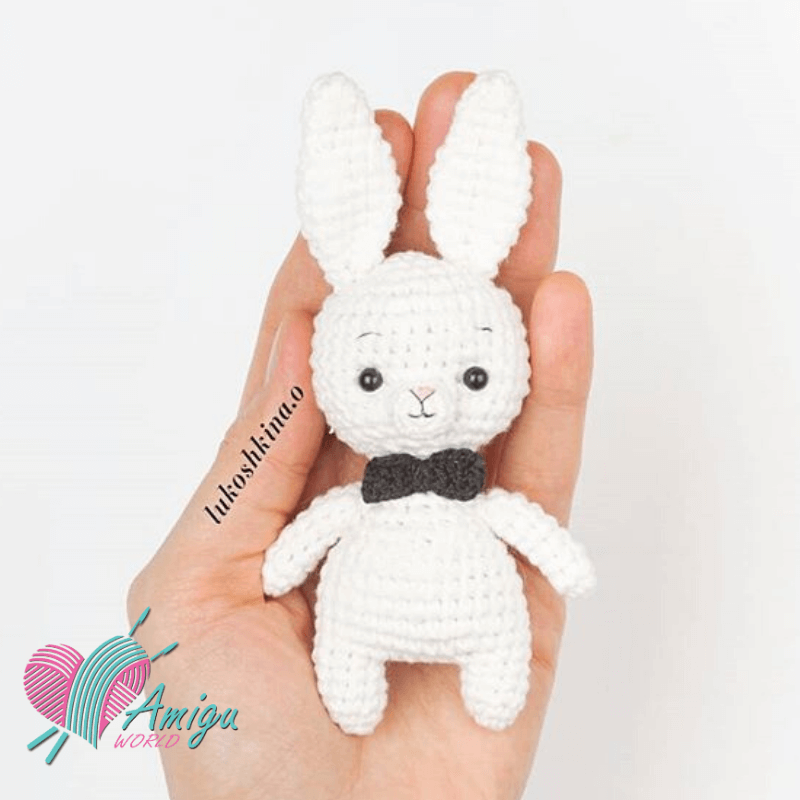
Little amigurumi bunny free crochet pattern
Pattern by: @lukoshkina.o
Picture by: @lukoshkina.o
Edit: @AmiguWorld
Abbreviations:
R= round
mr = magic ring
sc = single crochet
inc = increase (2 sc in the next stitch)
dec = decrease (join the next 2 stitches into 1)
W = (3sc-inc) = 3 sc in the next stitch
A = (sc3tog) = decrease 3 Stitches (join the next 3 stitches into 1)
sl st = slip stitch
st = stitch
ch = chain
dc = double crochet
tr = treble crochet
hdc = half double crochet
FO = finish off
[ ] = number of stitches you should have at the end of the round/row
( ) x 6 = repeat whatever is between the brackets the number of times stated

To crochet an amigurumi little bunny you need:
– Yarn: white, black, and pink
– Crochet hook
– Fiberfill for stuffing
– Sewing needle and scissors
Little bunny amigurumi
Free crochet patterns
![]()
Head
Start with white yarn
| R 1: 6 sc in mr | [6] |
| R 2: inc x 6 | [12] |
| R 3: (1 sc, inc) x 6 | [18] |
| R 4: (2 sc, inc) x 6 | [24] |
| R 5: (3 sc, inc) x 6 | [30] |
| R 6: (4 sc, inc) x 6 | [36] |
| R 7-11: 36 sc (5 rounds) | [36] |
| R 12: (4 sc, dec) x 6 | [30] |
| R 13: (3 sc, dec) x 6 | [24] |
| R 14: (2 sc, dec) x 6 | [18] |
| R 15: (1 sc, dec) x 6 | [12] |
Legs (make 2)
Start with gray yarn
Leg 1
| R 1: 6 sc in mr | [6] |
| R 2: ( 1 sc, inc) x 3 | [9] |
| R 3-5: 9 sc (3 rounds) | [9] |
FO. Stuff with some fiberfill. Cut the yarn, leaving a long tail for sewing.
Leg 2
Make the other leg, don’t cut the yarn. Continue to crochet 4 ch and join leg 1 with sl st.
Continue to crochet the body using the stitches of both legs.
Body
Start with white yarn
R 6: 9 sc (leg 1), 4 sc (4 stitches of chain), 9 sc (leg 2), 4 sc (4 stitches on another side of chain). [26]
R 7: (inc, 7 sc, inc, 4 sc, inc, 7 sc, inc, 4 sc) [30]
| R 8-12: 30 sc (5 rounds) | [30] |
| R 13: (3 sc, dec) x 6 | [24] |
| R 14: (2 sc, dec) x 6 | [18] |
| R 15: 18 sc | [18] |
| R 16: (1 sc, dec) x 6 | [12] |
| R 17: 12 sc | [12] |
FO. Stuff with some fiberfill. Cut the yarn, leaving a long tail for sewing.
Arms (make 2)
Start with white yarn
| R 1: 6 sc in mr | [6] |
| R 2: 6 sc, inc | [7] |
| R 3-8: 7 sc (6 rounds) | [7] |
FO. Stuff with some fiberfill. Cut the yarn, leaving a long tail for sewing.
Ears (Make 2)
Start with white yarn
| R 1: 6 sc in mr | [6] |
| R 2: (inc, 1 sc) x 3 | [9] |
| R 3-4: 9 sc (2 rounds) | [9] |
| R 5: (inc, 2 sc) x 3 | [12] |
| R 6: (inc, 3 sc) x 3 | [15] |
| R 7-9: 15 sc (3 rounds0 | [15] |
| R 10: (dec, 3 sc) x 3 | [12] |
| R 11: (dec, 2 sc) x 3 | [9] |
| R 12: 9 sc | [9] |
FO. Stuff with some fiberfill. Cut the yarn, leaving a long tail for sewing.
Tail
Start with white yarn
| R 1: 6 sc in mr | [6] |
| R 2: (inc, 2 sc) x 2 | [10] |
| R 3-4: 10 sc (2 rounds) | [10] |
FO. Cut the yarn, leaving a long tail for sewing.
Muzzle
Start with white yarn
| R 1: 6 sc in mr | [6] |
| R 2: inc x 6 | [12] |
| R 3: (3 inc, 3 sc) x 2 | [18] |
| R 4: (2 sc, inc) x 6 | [24] |
| R 5-6: 24 sc (2 rounds) | [16] |
FO. Cut the yarn, leaving a long tail for sewing.
Assembly:
– Sew the muzzle on the head. Embroider has a nose and brows (like the picture). The muzzle should be centered between the eyes.
– Pin the ears to the head, then sew them on.
– Pin the arms to the body, then sew them on.
– Sew the head to the body
– Sew the tail to the body
This bunny amigurumi is so cute and really fun to make. If you decide to make your own We would love to see them! Share your photos on Facebook, Instagram, or Twitter and use the #amiguworld hashtag.
Thank you for supporting us.
#AmiguWorld

You Might Also Like